“Fox Explorer”
Created: 31/7/2013
By: Robert Vulpe
Email: nytr0gen.george@gmail.com
Thank you for purchasing my script. If you have any questions that are beyond the scope of this help file, please feel free to email via my user page contact form here, or email me at nytr0gen.george@gmail.com. Thank you so much!
Table of Contents
- Preparing
- Upload process
- Installation
- Install.php explanation
- Interface explanation
- Template
- Cascading style sheets
- Javascript files
- Images and icons
- Faq
1. Setting up your FTP server - top
This script requires PHP 5.3
Now, first thing you want to do, is to setup your FTP server for the domain where the script will be installed.2. Upload process - top
The first step is to upload the content inside the folder "Script" (IMPORTANT NOTE: Upload what's inside the folder Script, not the script folder) into your public_html folder or into your default FTP root folder.
3. Installation process - top
Now, after you uploaded everything, you can start the installation process.
All you have to do now is access from your browser the file name install.php and make those configurations. Check the install.php explanation here.
After you are done you have to delete this file manually from the FTP. Also, later, you can reupload it and reinstall if you changed your mind about something. It's that easy.
4. Install.php explanation - top
- Title - this is the title your File manager is going to have. I'd name it Fox Explorer, but that's just me. It's your choice.
- Password - here you can choose a password so just you and anyone you want can access the script. Also, leaving it empty means no password.
- Date format - this is the format Modified time and Created time will show in. For a better understanding check this out http://php.net/manual/en/function.date.php
- Home directory - is the location the File Manager will start in.
- Base directory - is the location the File Manager won't be able to access beyond. For security reasons or whatever you think. You can set it to / on Unix or C:\ in Windows so that you can access everything.
- Actions - it's also a matter of security. Leaving it as is will have everyone accesing the script be able to do anything with the files on server.
5. Interface explanation - top

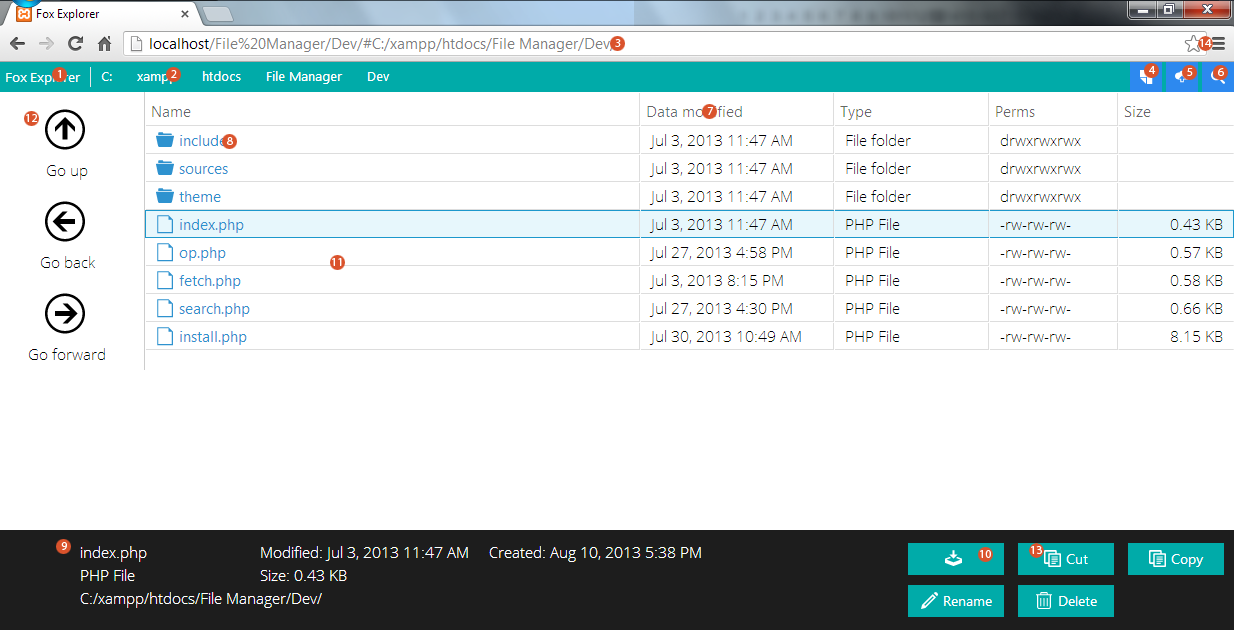
- The title. You can change it when you are installing the script or by accessingincludes/config.php. Clicking it gets you back to the home directory.
- The path you just accessed. By clicking any directory name from that bar it gets you to that folder.
- The location bar. Here you can quickly change your current path to anything you want.
- New folder button. By pressing it a dialog box will pop up asking you what should it be named. It will create the folder in your current path.
- Upload button. By pressing it a dialog box will pop up in which you can select any files from your computer and upload them to your current path.
- Search button. By pressing it a dialog box will pop up in which you can type your search query. Wildcards are accepted. It will search your current path and all the subdirectories.
- File headers(name, data modified, type, perms, size). You can press on any of them for an instant sort of files.
- A directory. Pressing it opens that specific directory.
- Information box. It provides a detalied look about the file.
- Download button.
- Files. Pressing any file from here will make the Information box appear with details about that specific file and options. You can select multiple files.
- Up, back, forward.
- Tools. Cut, copy, paste, rename, delete. After you press cut or copy, you will have the option to paste that file anywhere you want just by browsing the explorer wherever you want.
- You can bookmark any path and access it later from your web browser.
6. Template - top
The template is located in theme directory. You will find there all images, css files, html files and javascript scrips I used for creating this gorgeous design. Also, you can change anything to fit your specific needs of the site.
In case you want some elements to behave dynamically in interaction with php all you have to do is add $_tmpl['element'] in index.php or, depending on your needs, any file from sources directory. Then you will add it into one of the html files using {$element}. That does the trick.
7. Cascading style sheets - top
This script is designed almost fully with modern.css from http://metroui.org.ua/ . Those guys did the greatest job with this design and I am very proud to be a part of making the world more pleasant to the eye with beautiful aesthetics. You can find the license here
Also for a better understanding of how it works, check out their site.
8. Javascript Files - top
This script is coded with the powerful jQuery. Much appreciation to everyone in that project.
Also I have used liteUploader, TinySort, Dialog Box from Metro UI and my own javascript file. They are all located in theme under js.
9. Images and icons - top
Metro UI CSS has a very amazing colection of icons. You can check them out and see how they work here.
10. Faq - top
- Q: Will you add updates or is this the last version of the script?
A: I will very much appreciate some feedback. I am open to new ideas and features for this script and I will definitely work on making it better and more gorgeous. - Q: How can I contact you if I have a problem related to the script?
A: You can find me at nytr0gen.george@gmail. I always check my email so I'll get back to you in a very short amount of time.
Robert Vulpe